Sellerie des Champs Downloads & Guides
Home=> Guides and Tutorials => Editing with Offaly=> Coat Enhancement Tutorial
Coat Enhancement Tutorial
Tutorial using Photoshop CS and Intuos Tablet by Wacom

Foreword
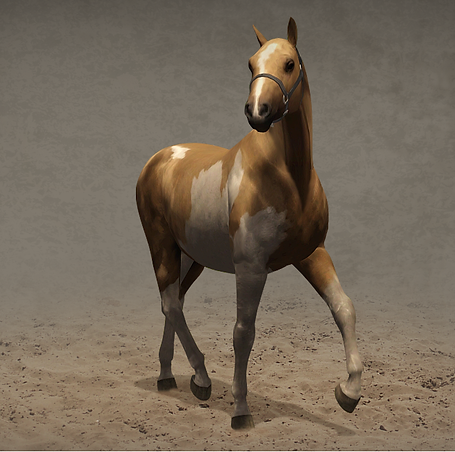
This tutorial is not to be applied directly on your sim horse. You must fix the general anatomy (changing the general shape of the legs/chest/etc) first. The before picture above is after the general changes. You can view the actual original shot here.
Note that if you do not make those outer body changes, the coat enhancement will not fix that ridiculously high neck port and those scrawny legs shaped like "balloons", which means, the end result won't be completely realistic. If you aren't sure how to fix things, send me a little request (either here in the contact page, or on tumblr and I will attempt to make a tutorial on it.
This tutorial will not teach you where to place your highlights/shadows. It will show you where I am placing mine on this particular picture, and the technique I use, but if you don't have a general idea of anatomy, this will not help you. To be clear, I am not saying you need to learn where every muscle is and what bone is where (although it's cool if you want to) - I haven't - but you do need to train your eye and when you can, use a reference.
How do you train yourself you might ask. Well, looking at other people's work is a good place to start. I particularly enjoy looking at work from artists on deviantART (BH-Stables, Sealle, BRIs-love-is-MY-live, ehetere, feverpaint... and many others). It's often easier to take in the general anatomy from those drawn horses because they are well shaded compared to real life photographs in which details are often barely visible.
After that, there isn't any secret... practice, practice, practice. Your first attempts might not look great... and even when you know what you are doing, there are times when things will look good and times when they won't. Don't worry too much about slipping back, or if it takes you a while to get it... And don't worry too much about a perfect anatomy either.. mine definitely isn't but for this particular editing style, being 100% accurate is not super important. Concentrate more about blending things in nicely and making sure you like the result.
About the tools
For this edit I used a tablet with working pen pressure so all brush size indications are only relevant to people using tablets with pen pressure. If you are using a tablet with no pen pressure or you are using a mouse, do not worry, this tutorial works for you too, you just need to use smaller size brushes :)
I do not use custom brushes for any of the coat painting. All you need are a hard round brush (at 3 px for most of the scribbling, and at 2 px
for details like lashes and other delicate tiny things - mouse users use at 1 px) for the brush tool and a soft round brush (at 10 px for most of the blending, 20 px for large non precise areas and between 5 and 7 px for delicate/high precision areas like the nose and ears - mouse users you might want to do 5 px, 10 px and 2-3 px) for the finger tool.
From Beginning to End: the Body


Slide 1: Just your horse ready to be painted on.
Slide 2: Make a new layer. Select the darkest color of your horse and then go a few shades darker (I prefer starting with darks but I suppose you could start with lights if you prefered. Once chosen, all you have to do is kind of sketch the dark areas on your horse. I used a reference loosely as you can see. My ref was small and didn't have much depth, so if you are trying this for the first time, I highly recommend you choose a bigger reference that has much more visible details.
Slide 3: Smudge gently. Make absolute sure that meaty/muscle areas are really blended in. You want to avoid having some thick standing out lines at all costs. You can see mine aren't that great but sometimes you have to wait until a few steps down the road to see where things are going.
Slide 4: Because my horse has a two toned coat, the shading on the white areas of my horse was too dark. To fix it, you have two options; you can either use the dodge tool or you can make a clipping layer (new layer then ctrl+g), and paint over it with a lighter color. I chose to do the second one this time. I clipped a layer and then chose a pure white and went over the "white" spots of my horse. Finally I lowered the opacity of the layer until I was satisfied (here, the opacity of the white layer was at 5%). When happy, I merged my clipped layer with the shadows layer.
Slide 5: Make a new layer. Select the lightest color of your horse and then go a few shades lighter. Because my horse is white and gold, I chose to go with a pure white, with the intention of changing the color of the my highlights on the non white parts later. Similarly to slide 2, I scribbled in places where the muscles and bone would stand out. Try to think of your light source as well.
Slide 6: Same as slide 3, smudge and blend.
Slide 7: This part, just like slide 4, is only relevant if your horse's coat isn't a solid color. Make a new clipping layer and then select the lightest color of the area you are going to fix, and go a few shades lighter. Simply go over all the colored areas.
Slide 8: Using the dodge and burn tools I went over my highlights to allow them to conform with the original light sources of my horse. I also smudged some areas some more to make the blending better.
Slide 9: Here, I realized that my highlights for the golden areas of my horse had too much of a yellow undertone, so using the hue/saturation... adjustment, I made them a tiny bit more red. Once happy with both the whites and the golds, I flattened those two layers into one.
Slide 10: Now that we have our highlights and shadows, we can see that EA failed us in some areas. So hiding our shadows and highlights layers, go back and make a new layer underneath them and fix markings which are too sharp and erroneous shadows (here circled in red).
Slide 11: New layer! Using the color used in slide 2, go ahead and make some additionnal more precise shading scribblings
Slide 12: Blend.
Slide 13: Make a new layer and with pure white scribble in places where the coat would shine (think of the type of horse you are working on. Shaggy ponies don't shine as much as warmbloods for example).
Slide 14: Blend VERY lightly. Leaving a little bit of sharpness is good here as it brings in some texture.
Slide 15: Set the shine layer to overlay.
Slide 16: Here I realized I didn't like that EA shadow in the neck so I went back to my corrective layer that we made in slide 10 and fixed it.
Slide 17: You might have noticed that the nose hasn't been touched until now. It's because it needs so much correction that I prefer giving it its own layers. To view how the nose is done, scroll down this page.
Slide 18: Same thing for the eyes - detailed tutorial down the page.
Slide 19: Fixed my horse's ears. If your horse is on a separate layer from the background, you can just erase. If your horse and background are merged already, just make a new layer and paint over using the colors in the background.
Slide 20: Time to work on the hooves. Make a new layer. Here I started with highlights. By now you know the drill.
Slide 21: Surprise, more smudging!
Slide 22: New layers for the shadows on the hooves.
Slide 23: You guessed it, more blending.
Slide 24: We're pretty much done by now so you can look and see if you like the overall intensity of your enhancement. I thought mine was a little too much on the body (my 2 shadows and 2 highlights layers), so I changed the opacity of the corresponding layers. Here I put them all at 90% but the percentage will depend on your liking.
Slide 25: Added some pink on my horse's nose, setting the layer on soft light as not to cover the work done underneath. This is only necessary if the marking you used on the face goes over the nose but doesn't have a pink channel (a lot of the old markings are like that and sadly trying to fix it in game isn't always possible).
Slide 26: Another little fix on my horse's shape. The shoulder was protruding a little oddly above the left foreleg, so I erased a tiny part to smooth it out.
Slide 27: Because my horse here is a pony (although you frankly can do it more or less for all types of horses) I added some fluffier coronets (on a new layer of course). Use the color of the leg where you are drawing.
Slide 28: Adding fetlocks. If you are working on a sporty breed, chances are you can skip this. If you are working on hairy breeds, this is absolutely necessary. Start by drawing hair on a new layer using the color of the leg where you are drawing. I hid my background layer because the colors blended in too much and I couldn't see what I was doing.
Slide 29: Making a clipping layer, add some contrasting strands to make the whole hair a little more natural. Merge.
Slide 30: Because of my angle, I moved my fetlock layer behind my horse layer.
Slide 31: Bringing my background layer back into view, I finished blending my fetlocks with the legs.
Slide 32: On a new layer, I added some ear hairs and there you have the finished product.
Into the Details: the Nose


Slide 1: On a new layer, start by drawing the shape of the nostrils. Please, think of breed but mostly think of the effort the horse is furnishing at that moment. If your horse is galloping, his nostrils are going to be way larger than if he is just standing still. I always use pure black on grey muzzles.
Slide 2: New layer, shading time. This is the exact same process as with the body, you are just working on a smaller area and thus everything is going to be more precise.
Slide 3: Blend.
Slide 4: New layer, higlighting time. Same process as for slide 2.
Slide 5: Blend.
Slide 6: Correct areas that are too light with the burn tool (if you have areas that are too dark, use the dodge tool).
Slide 7: On a new layer, add a spec of lighter grey in the nostrils to give them a 3D effect.
Slide 8: Blend.
Slide 9: A little shine (using white) on a new layer. (again think of the breed and think of the situation. An arabian in a halter show is going to have a much shinier nose than a pony grazing).
Slide 10: Blend and set the shine layer to overlay. The nose is done.
Into the Details: the Eyes


Slide 1: Using black on a new layer, reshape the eyes to make them look realistic.
Slide 2: On a new layer choose a dark brown (or a dark version of the horse's eye color, if yours aren't brown), and shape the iris.
Slide 3: New layer, select a lighter shade of the eye color and just lay it gently on the bottom part of the iris. Never ever go around the whole thing.. your eye will not look right if you do that.
Slide 4: I made a slight correction on the eye shape (right eye).
Slide 5: On a new layer, I added two "white" (it's more of a light grey than a white) specs (a large one and a tiny one) to give life to my eyes.
Slide 6: After you have done the inside of the eye, you want to work the outside of the eye, so using a dark color go and scribble the shape (new layer of course). Don't forget a little lighter spec to do the third eyelid inside the eye corner.
Slide 7: Blend and add some additional facial shading if necessary.
Slide 8: Blend the new shading done in slide 7.
Slide 9: New layer, highlights.
Slide 10: Color fix of the highlights and blending.
Slide 11: Add some lashes and your eyes are done. :)